Binance Futures Module
The futures trading functionality is only available for users of the PRO version of the Moonbot terminal.
⚠️ Attention! Trading on futures markets is highly risky and can lead to the loss of a large part of the deposit. Before participating in futures trading, we strongly recommend that you carefully study all the features of this type of trading, as well as take all the risks.
On the Settings -> Login tab, you can choose to connect to a futures exchange, for example, Binance Futures, register API keys that support futures trading, and then you can trade perpetual futures on Binance with leverage from x1 to x150, that is, with a deposit of $1,000, you can work with an order of $150,000 and earn no more not only on the growth of bitcoin, entering long positions, but also on its fall, opening a short. More detailed information about futures trading can be found on the Binance exchange website.
For the Binance exchange, in the Moonbot terminal, on the Settings -> Login tab, you can select the Binance Quarterly connection for trading quarterly futures.
To launch the futures trading functionality, follow these steps:
-
Activate your futures account in the exchange's personal account (for example, on the Binance exchange);
-
Transfer some funds in the exchange account to the futures account (the minimum lot is $10);
-
Create new API keys with futures trading permission (when creating keys, you need to edit the permissions and check Enable Future);
-
Copy the current PRO terminal folder to create a separate copy of the futures trading terminal;
-
Launch the terminal and make sure that you have the PRO version;
-
Open the settings on the Settings → Login tab, select Binance Futures from the Exchange drop-down menu and click Apply;
-
Click "Register another keys" button, enter new API keys, click "Register API keys" button.
Basic settings and controls
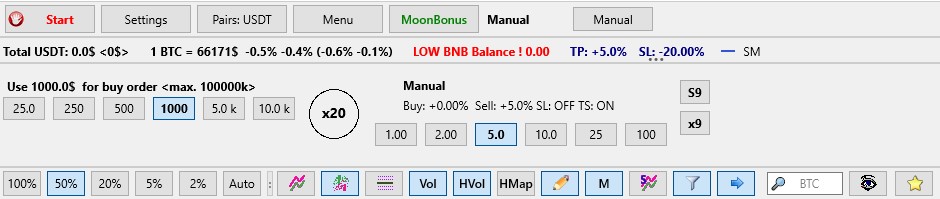
The deposit is displayed in the "Total USDT" line: the first value is $ actual deposit, the second value is $ deposit, taking into account the exposed leverage.
The leverage can only be changed on a chart that is open to the full screen. To change the leverage, click on the Futures Circle (in the x20 screenshot), select the desired leverage and click the Apply button. You can also use the mouse wheel scroll to change the leverage in the Futures Circle settings.
💡Note: the selected new leverage applies to the account and applies to all other terminals connected to it. Also, the maximum leverage or the same leverage can be set on all coins with one button — to do this, click on the "Show Markets" button, in the "MarketsTable" window of coins that opens, click on the "Manage Leverage" button and select the necessary actions.
The size of the Buy order is set based on the leverage.
When using a stop loss, it will be multiplied by the exposed leverage (x20 by default).
This means that with a stop loss of -1%, in fact, taking into account leverage, the losses will be N-times greater, although visually the stop loss will be displayed at -1% of the purchase price.
The "Show Spot trades\OrderBook" button in the futures trading mode has more settings than in the spot mode.

Principles of operation of the Moonbot terminal with orders and positions
A executed order (long or short) opens a position, and the terminal immediately issues a counter close order (short or long, respectively), similar to a Sell order in regular (spot) trading. A closing order in the terminal is called a SELL order, regardless of whether the order is Long or Short.
There is always one position on the stock exchange: either Long or Short. At the same time, several orders can be opened simultaneously in both directions in the Moonbot terminal.
It is recommended to practice on orders of the minimum lot size before starting work in order to understand the mechanics of placing orders.
-
For the Moonbot futures terminal on the right control panel of the main window
L: number of coins (Quantity) @ purchase price in $ (buyPrice) for a long position
S: number of coins (Quantity) @ purchase price in $ (buyPrice) for a short position
If you right-click on this line, an additional menu will open.
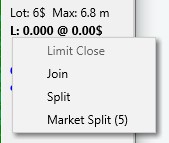
Limit Close - if there is an open position on the exchange, but it is not in the terminal for some reason, then when this option is selected, a Sell order will be placed in the terminal to close the current position.
Join - combine Sell orders.
Split - divide the Sell order into 3 equal parts, if the minimum order limit on the coin allows.
Market Split (5) - sell a market position in 5 randomly sized parts, used on all exchanges except the Hyperliquid exchange, as it has a market of orders, so orders will be placed in the spread of the order book.
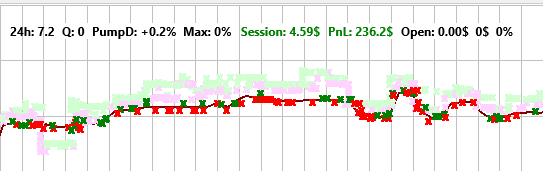
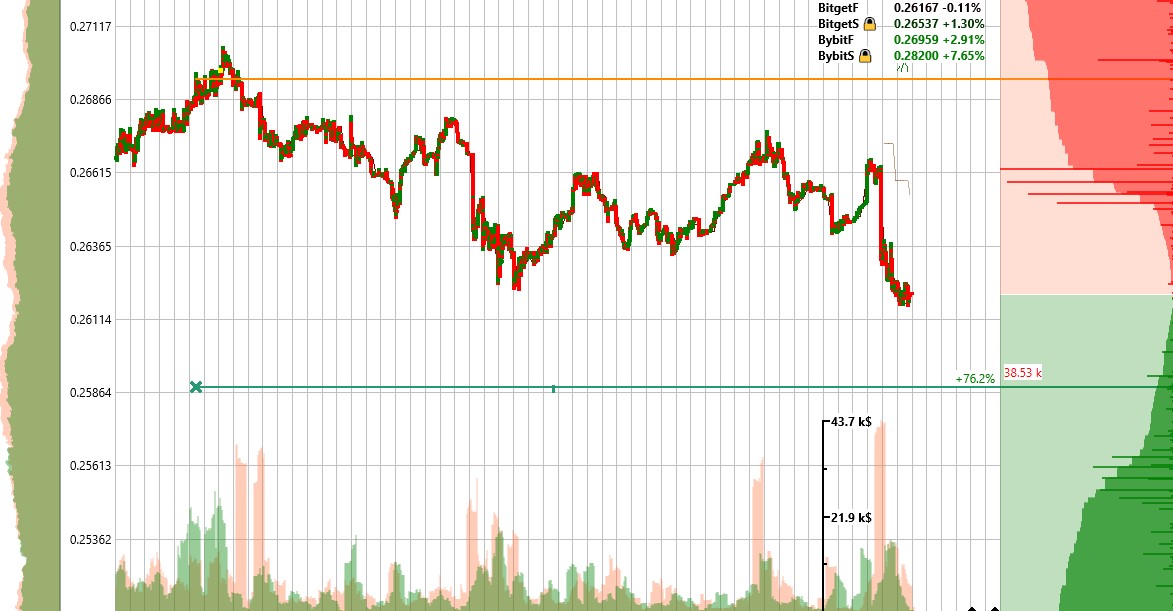
In addition to futures trades, the futures chart may display trades from the spot market, which are displayed in pale color and give an idea of the trend in the spot market.
Also, for an open position, the red line on the chart shows the liquidation level.
Please, in order to avoid losing your deposit, make sure that the liquidation level is at a great distance from the current price!
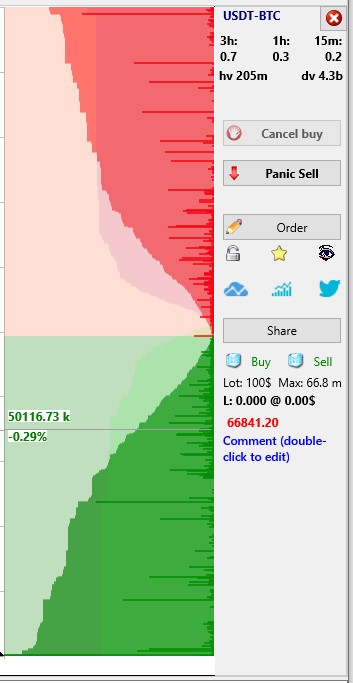
PnL is the total profit/loss from futures trading for the entire time since the opening of the futures account, excluding commission (you can hide its withdrawal on the Settings → User Interface tab).
⚠️ Important: the commission calculation in the terminal may not always be correct due to different maker/taker fees and different VIP levels. Keep in mind that the results of transactions may differ by ±0.2%, and be guided by the total balance.
Features and important recommendations
It is strongly recommended not to open positions for the entire deposit. Since trading is conducted using margin, when loading a deposit "at zero" there is a risk of losing Sell orders: there may not be enough free margin, since negative active orders reduce the available balance in real time. Therefore, when trading, carefully monitor the size of the free balance and do not use it completely.
⚠️ Important! When trading on an isolated margin, it is possible that the position will be liquidated immediately after opening. This happens if MarkPrice is significantly further than the current price and even further than the liquidation level of your position (especially on high shoulders). To avoid such cases, Moonbot strategies provide MarkPrice filters (MarkPriceMin and MarkPriceMax parameters) — for more information, see the corresponding section of the instructions.
When trading manually, it is necessary to independently control the MarkPrice value in order to prevent instant liquidation. Please note that the balance update in the terminal takes place with a slight delay — this is a limitation of the API.
Features of setting up SHORT strategies
-
All strategies except MoonShot, MoonHook, MoonStrike, and Liquidations do not reverse the detection conditions. For example, if a short is enabled in the Drops strategy, the detection conditions do not change. When the price drops and the detector is triggered, a short order is placed instead of a long order;
-
For short orders, the values with minus signs in stops, trails and other sections do not need to be changed — the terminal will "flip" them on its own;
-
The terminal also "turns over" the ratio of BV_SV in filters and stops. For Short strategies, the ratio of sales to purchases (SV_BV) will be determined;
-
When trading short in the futures market, it should be borne in mind that the calculation of the position of Sell and stop orders comes from the point of purchase, and for a short, a purchase is an exit from a position. By setting the stop percentage in a strategy, it is customary to measure the stop from the entry price (sale), as in a long position, but the actual stop will be calculated from the closing price (purchase) and the stop will be set further (the longer the stop length, the greater the difference).
For example, the value of an asset is 100, we set the stop in the strategy at -50%, it will not be set at 150, as in the long, but will be set at a price from which there will be 50% to the entry point, that is, it will be set at a price of 200. The actual loss on the transaction in this value will be -100%. The take profit is calculated according to a similar calculation, i.e. by setting the strategy to +50%, the take profit will be set at a price of 66.6, since from 66.6 to 100 plus 50%.
When setting up a strategy, consider the leverage you have set. All values will actually be multiplied by the leverage. To check the correctness of the strategies, we recommend testing everything on small orders.
A change of leverage to a smaller one is possible only if there is sufficient balance to cover the margin of an open position with a new leverage.
It is not recommended to trade on several terminals at the same time — there are risks of a lack of deposit or an increase in positions, as they may have already been opened by another terminal. There may also be a partial or complete closure of a position when another terminal opens an opposite position (there was a long, but a new short opens, or vice versa).